Resources
See also: Forms, Fields, Working with Databases, Working with REST, Working with Email
Introduction
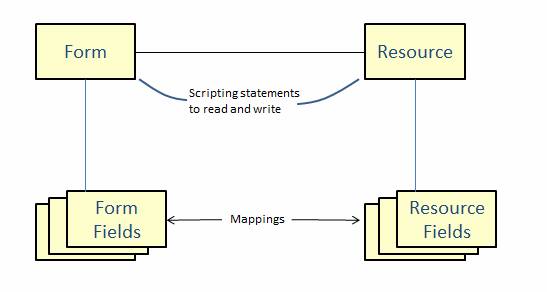
Resources are used to access external systems including databases, email, web services, XML and many more. Any technical complexity is configured within the Resource itself and a resource is requested to perform some action using a simple script statement e.g. to read a record from a database: resources.requests.fetch().
Each Resource contains resource fields and data is transferred between a resource and a Form using mappings which map resource fields to Form Fields. Resources are added to a form by adding or dragging them into the Resources View.
How they work
Verj.io supports integration with a number of external resources: databases, stored procedures, email, XML, Web Services, message systems such as MQSeries, printing and custom resources.
What these external resources have in common is that they all have the capability of exchanging data with Verj.io Form Fields or Tables via a mappings layer. The Verj.io view of these resources is that they consist of a number of resource fields, and that these resource fields can be mapped to form fields. Data exchange between an external resource and a form is performed using script coding, see examples below.
The Verj.io integration framework for external resources is shown in the following diagram:
The steps to integrate a form with an external resource are:
1. Create the resource
2. Add the resource to the form by dragging it into the Resources View within the Form Editor
3. Import fields from the resource into the form or create a table backed by the resource then import the columns
4. Code script commands to read/write data to or from the resource as required
The advantage of importing fields from an external resource
as described in step 3 is that this automatically creates the mappings between
form fields and resource fields; an alternative approach is to manually create
the mappings using the mappings icon ![]() at the top of the Resources View in the Form
Editor.
at the top of the Resources View in the Form
Editor.
Resource Types
Here is a summary of the various resources supplied with Verj.io:
|
|
|
|
Databases |
|
|
XML |
|
|
SOAP Web Services |
|
|
REST Web Services |
|
|
Stored Procedures |
|
|
Email |
|
|
Messages including IBM MQ Series |
|
|
Printing Resources |
|
|
Custom Resources |
|
|
CSV Resources |
|
|
|
|
Documentation for deprecated facilities from previous
releases:
|
XML Custom Resource |
|
|
Web Services Custom Resource |
|
|
XML Custom Resource example |
|
|
Simple XML Resources |
Resources View
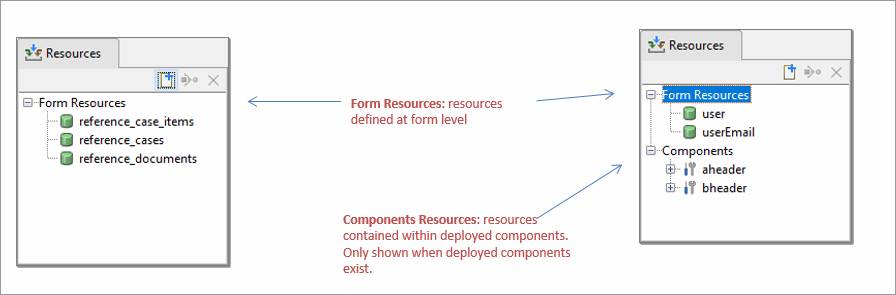
The Resources View contains a list of resources available to the parent Form/Application Layout/Component/Integration Service or Workflow Process. A resource must be added to this view before the resource fields can be mapped or the resource is referred to in a scripting statement. Resources contained within deployed components are only shown if deployed components exist and are then shown under the prefix name for each deployed component. Application Layout resources are not shown on the Forms Resource View.
Resource View Features
- The icon to the left of each resource identifies the resource type. These are the same icons used in the designer tree (right click in the tree and select New for a list)
- Double click on a resource to open the corresponding resource editor
- Single click on a resource displays the resource properties in the properties view.
- Move the mouse over a resource name to display its path
- To select a range of resources hold down the Shift key; to select multiple non-contiguous resources hold down the Ctrl key
- Resources
can be added by dragging them from the tree view or by clicking the new
resource icon

- Resources can be copied and pasted between forms, components, integration services and workflow processes
Resource Names and Paths
The Resources View shows the name of each resource, and its path can be displayed by moving the mouse over the name. The Resource name is particularly important as this is the name that will be used in any script statements to identify the resource e.g. to call the Web Services resource shown in the diagram above:
resources.FLIGHTS_RES.call();
Similarly the resource name is used when a table is linked with a resource.
Resource names must be unique within each Resources View.
You can change the name to anything you like, but the path can only be changed by refactoring the resource itself. You can think of the path as the unique identifier for the resource and its name as an alias by which the resource is known in a particular form.
Resources toolbar
Following functions are available; shortcut keys shown in parentheses. Short cut keys apply only when the Resources View panel is in focus.
|
|
(Ctrl N) |
Add a new resource |
|
|
(Ctrl M) |
Show the resource mappings for the selected resource. This is only available when a single resource is selected. |
|
|
(Delete) |
Removes the reference to selected resource(s) – note that this does not delete the resource itself. Also removes any mappings for the resource(s). |
Right click functions
Following functions are available when one or more resources are selected; shortcut keys shown in parentheses. Short cut keys apply only when the Resources View panel is in focus.
|
Add resource |
(Ctrl N) |
Add a new resource |
|
Show mappings for resource |
(Ctrl M) |
Show the resource mappings for the selected resource. This is only available when a single resource is selected. |
|
Remove resource(s) |
(Delete) |
Removes the reference to selected resource(s) – note that this does not delete the resource itself. Also removes any mappings for the resource(s). |
|
Cut |
(Ctrl X) |
Same as copy, but also deletes selected resource(s). |
|
Copy |
(Ctrl C) |
Copies selected resource(s) to the clipboard. |
|
Paste |
(Ctrl V) |
Paste is only enabled when resource(s) have previously been copied to the clipboard. You can copy/paste resources between any two Resources Views. Resources are automatically renamed when a resource with the same name already exists in the target form; this is done by adding an underscore and a number to the resource name. Field mappings are copied/pasted with their owning fields and this must be done as a separate step. For this reason, it is recommended that resources are copied first followed by any mapped fields. In this way the mappings will also be pasted. When the pasted resources include one or more deployed component resources, the resources are pasted as if they are not part of a component and double underscores in all names are changed to single underscores. |
|
References |
(Alt Ctrl R) |
Displays references to the selected resource in the References Panel |
Properties
Resource properties are displayed in the Properties View panel when a resource is selected in the Resources View panel.
|
Description |
|
|
Resource name |
The name of the resource. Changing the resource name will also update all the mappings for the resource. |
|
Resource path |
The path to the resource. The mappings are not changed when the path is changed. |
|
Linked Component |
This property is shown only when the resource is part of a linked component. It shows the name of the component as a link, clicking on the link opens the component. |
Script Examples
Javascript (uses Verj.io programming API):
By invoking methods on the resource objects e.g.
resources.DbResource1.fetch();
resources.DbResource1.insert();
resources.Email1.sendmail();
resources.WebServiceExample.call();
resources.Xml1.read();
Tables are different, you invoke methods on the table and the table is linked to a resource:
tables.CustomerTable.fetchTable();
// loads data into the table from the resource
tables.CustomerTable.updateTable();
// updates the resource from the table
FPL:
By issuing commands: e.g. fetch, insert, read, sendmail etc
fetch DbResource1;
insert DbResource1;
sendmail
Email1;
call WebServiceExample;
read Xml1;
Tables are
different, you invoke commands on the table and the table is linked to a
resource:
fetchtable
CustomerTable; //
loads data into the table from the resource
updatetable
CustomerTable; //
updates the resource from the table