Forms
Using an Application Layout in a
Form
See also: Form Editor, Designing For Accessibility, Page Properties, Resources, Understanding Server-side Events, Working with Components
Introduction
A Form is the principal entity within Verj.io and is made up of any number of related web Pages, Fields, Tables, Texts and Resources.
The user navigates to a Form via a URL in their browser and the Form defines which of its Pages is displayed first. A web application can consist of any number of Forms and the user can navigate between different Forms and their Pages.
A Form can be linked to an Application Layout to provide the overall structure for each Page of the Form and Application Layouts can be linked to a Theme to provide the look and feel. Alternatively, a Form can be linked directly to a Theme. Linking all your Forms to an Application Layout makes it easy to achieve a consistent user experience across your application.
Design Process
Typically, once a Form is created, the design process is as follows:
- Link the form to an Application Layout using the General Form Properties.
- Drag in any resources required to the Resources View to provide integration with external resources such as databases.
- Create any required Fields or Tables.
- Add Controls to the Page by dragging and dropping objects from the Palette View, Fields View or Tables View.
- Configure and style the Controls as required.
- Add programming as required.
- Repeat steps 4 – 6 for any additional Pages.
Using an Application Layout in a Form
When a Form
is configured to use an Application Layout, the Controls and style from the Application
Layout are automatically applied to the Form.
Page
content can be added to the Application Layout’s Main
Control in the WYSIWYG View and the Outline View.
Editing the Application Layout or configuring a different Application Layout automatically updates all of the Pages in any Forms that are using it.
A Page can
specify not to use its Form’s Application Layout,
which can be useful if the Page needs to be styled differently, for example
when designing a printable Page.
Navigation
A Form is run from a browser using its unique Form name, with either of these URL formats:
- URL format introduced with Verj.io V5.0 (using the form name plus “.eb”) :
=> domain/webapp/<formname>.eb
e.g. www.mysite.com/ebase/PortalApp.eb, http://localhost:3030/ebasetest/PortalApp.eb
- URL format used with previous versions and still valid in V5.x:
=>domain/webapp/ufsmain?formid=<formname>
e.g. www.mysite.com/ebase/ufsmain?formid=PortalApp, http://localhost:3030/ebasetest/ ufsmain?formid=PortalApp
Additional parameters
can be added to the end of these URLs as required to pass values into the Form
e.g.
www.mysite.com/PortalApp.eb?p1=xxx&p2=yyy
In this example both p1 and p2 need to be added as Form Fields and the URL Parameter property should be checked in each Field’s properties.
Properties
The Form Properties dialog can be opened by clicking on the ![]() icon in the Form Toolbar. It contains tabs for
the following properties:
icon in the Form Toolbar. It contains tabs for
the following properties:
- General Properties
- Event Properties
- Web Resource Properties
- Text Properties
- Security Properties
- Workflow Properties
- Save Restore Properties
- JSP Properties
- Final Page Properties
- Header Properties
- Miscellaneous Properties
Programming
Programming logic is added in scripts, and these scripts are attached to events, where:
- Events are points within the processing flow of a form e.g. on click event for a button or hyperlink
- Scripts are programs written in any one of the supported server-side programming languages of which Javascript is the most commonly used and most powerful option. An interactive debugger is available for Javascript scripts.
Scripts can be used for all kinds of purposes e.g. validating user input, dynamically changing the sequence in which pages are displayed, dynamically changing the properties of any of the elements described above, interfacing with external resources e.g. to read and write from databases, call web services, send emails etc.
The system supports many events, of which the most important are shown below with some typical uses for each event:
|
Event |
Typical Use |
|
Form Events |
|
|
Before Form |
To perform any preliminary processing before the first page is displayed to the user e.g. load information from a database or some other external system. |
|
After Form |
To perform any final processing: this might include inserting database records, sending emails. This event is only executed when the user clicks on the optional Finish Button – see page navigation buttons. |
|
On Error |
Receives control when a failure occurs. Used to display a customized error page to the user. |
|
Back Button |
Receives control when the user clicks the back button. |
|
Page Events |
|
|
Before Page |
To perform any preliminary processing for the page e.g. loading database data, displaying or hiding fields, making fields display only or enterable etc. |
|
After Page |
Receives control when the user clicks the optional next page button. Used to perform page level validation or cross field validation. |
|
Previous Page |
Receives control when the user clicks the optional previous page button. |
|
Control Events |
|
|
Validation |
To perform validation of data entered by the user. |
|
On Click |
Used to perform specific processing when the user clicks
something – e.g. a button, hyperlink, image, tab, menu item etc. |
Click here for more information on events.
Click here for details of server side programming.
Client-side events can also be used to drive Javascript programming within the browser.
Integration
Integration with external systems is achieved using external resources and the system supports a number of these: databases, XML, Web Services, email, MQSeries, Custom (Custom Resources are customer-written Java classes). Click here for a summary of the functionality provided by these external resources.
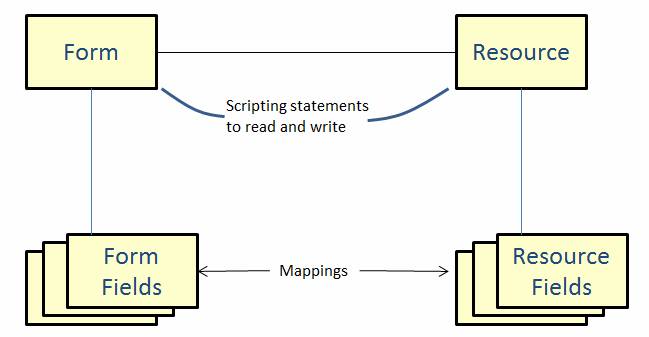
What these
external resources all have in common is that they have the capability of
interchanging data with form fields and/or tables. Each resource consists of a
number of resource fields/tables, and these can be mapped to form
fields/tables. The interchange of data between an external resource and a form
is under the direct control of the forms designer and is controlled using a
number of script commands e.g. FETCH, UPDATE, INSERT, READ, WRITE, SENDMAIL
etc. The framework for handling external resources is shown in the following
diagram:
Click here for
more information on integration with external systems.
Messages
Messages are just texts that can be displayed under program control. There are two types of message that can be generated:
·
error messages are by far the most common
type. The user must correct the error to proceed.
·
warning messages are similar to error
messages except that the message should be displayed to the user, but the user
can then proceed.
Processing of these two types varies a little according to the scripting language used:
· With Javascript, messages are added using one of the MessageContainer.addErrorMessage() or MessageContainer.addWarningMessage(). These methods provide options on whether or not processing should stop immediately so the message can be displayed to the user, or whether processing should continue. This provides a way for an application to validate all user input and display multiple messages. Messages can be added to a page or a control.
· With FPL, when a script issues an error message, form processing stops immediately and the page is re-displayed to the user with the error message. When a script issues a warning message, form processing will not stop.
There are a number of options to control the
positioning and styling of messages.
(See Messages for more information)
Lists
A
list gives the user a choice of selectable values and is normally displayed as
a dropdown, although options are also provided for displaying a list as radio
buttons or as checkboxes. A list is defined as a separate entity within the
Studio and can then be associated with any field or table column. Verj.io
supports 3 types of list:
·
A static list contains language dependent
values which change rarely or never. An example of this might be title
containing English values: Mr, Mrs, Ms, Miss, and French values : M, Mme, Mmle.
·
A dynamic list represents a list of
values which will be read from a relational database. These lists are not
language dependent. To configure a dynamic list, the forms designer must
specify the database table(s) and column(s) and optionally the WHERE clause to
be used. Verj.io supports complex SQL constructs involving views, joins etc.
Additional database columns can be retrieved and mapped to form fields. For
example it is quite useful to be able to display something meaningful to the
user such as product names, and then automatically populate an additional form
field such as PRODUCT_ID with a numerical value, which is of no interest to the
user, but of plenty of interest to the form designer.
·
A
custom list is dynamically created
by the application at runtime using a script.
See
Working
with Lists
for more information.
Components
A component
provides a way to create a sharable piece of form functionality. Components are
created separately from forms and can then be inserted into any number of forms
as required. Subsequent changes to the component can then be deployed to all forms that include the
component. A simple example might be an address component which could contain
all the usual address fields plus scripting logic to perform a postcode lookup
and populate all the address fields from this. Rather than create this in every
form where it is required, it can be created just once as a component then
inserted into any number of forms.
See Working with Components for more information.
Page Navigation Buttons
The system can optionally provide page navigation buttons on each page, and these can be included by inserting page navigation controls (there are a number of these). This is based around the idea – that doesn’t apply to many apps - that a form consists of a sequence of pages to be displayed in turn, ending with the user eventually clicking a submit (or Finish button) from the last page in the sequence to commit his/her work. Prior to clicking the Finish button, the user is free to navigate forwards or backwards through the page sequence. This is illustrated in the diagram below:
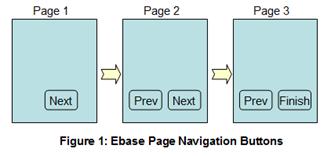
· The Next Page button is displayed whenever a next page is configured. When the user clicks this button, the after page event for the page is executed.
· The Previous Page button is displayed whenever the user has navigated forwards. When the user clicks this button, the previous page event for the page is executed.
· The Finish button is displayed when no next page is configured. When the user clicks this button, the after page event for the page is executed followed by the after form event.
A number of page navigation controls representing these buttons are available and can be added to pages as required. Alternatively, designers can choose to insert their own buttons to control navigation between pages.
Click here for further information on provided page sequencing and navigation buttons.
JSPs
Each form page can optionally be surrounded by 4 Java Server Pages (JSPs) or HTML pages corresponding to top, left, right and bottom of the page. These are commonly used to include content that is common to all pages of a form e.g. company name, logo, images etc. These JSPs can access the form’s state data – fields, tables, pages etc, so it is also possible to create panels containing navigation menus etc.
See Surrounding JSPs for more information.
Printing
The system employs a simple page design concept: any page
created in the Studio can be output either to a web browser or to a PDF or to
both of these. This means that the same page designer is used to create both
web and print pages. There is no explicit declaration that a particular page is
a print page; instead any page can be output as a PDF. With FPL, the FPL outputpage
command is used, with API based languages, the form.generatePdf()
method is used.
Main features:
- Display document to user and/or save to file
- Flexible layout
- Content can be changed dynamically using scripts
- Dynamic expansion
- Automatically make fields display only
- Headers, footers, margins
- Full support for CSS3 Paged Media properties
Click here for further details.
There are two alternative approaches available:
- Legacy Print Forms – a separate PDF designer
- Importing existing PDF form documents into print
resources